
Do you want to start a WordPress blog? Do you want to be your own boss? Do you want to establish your expertise and open the doors of opportunity?
Then you have come to the right place! This comprehensive guide will surely help you in-depth to know everything about a WordPress blog.
I believe that someone somewhere writes that ‘blogging is dead’ almost every year, and yet year after year, that proves to be the complete opposite of the facts.
Blogging is still alive and kicking most certainly, and will be across 2020 and beyond!
Blogging just keeps getting better and better, in my opinion. It’s no longer a simple online journal, but your ticket to a rewarding career, amazing opportunities, and tremendous quantities of personal growth and self-development. So what are you waiting for? Start creating your WordPress blog now!
WordPress blog hosting is an affordable solution for anyone looking to build their online presence. WordPress is an open-source content management system (CMS) that is written in PHP and synched with a MySQL database. The WordPress software package is available to the general public for free; however, some companies will charge you for add-on WordPress plugins.
WordPress offers you many tools for your websites, such as website building tools, user profiles, blogs, and more. Features include a template engine and a plugin system, called Themes, which allow you to make your theme to use on your blog. WordPress has so many features that it is the best platform for you to choose to start your blog.
Another great feature of WordPress is its user-friendly interface, allowing you to create blogs that are easy to use and add custom features.
So let’s get started on the extremely exciting journey of your WordPress blog creation.
Step1: Select a Domain Name
Most people think that the domain name should be witty or clever, or maybe even poetic. Or something that sounds cool and freezy like Amazon, Google, or Moz. Well, it is completely wrong!
Your domain name is your tool or your signature that you possess to show the entire world. And like every other tool that you might have in your toolbox, a domain name has its purpose.
If you’re new to the world of internet marketing or if you just want to make a better name for your online business, you need to know how to choose a domain. You need to get something easy to remember and easy to type as well. It also should be unique, which will give you some credibility.
An important thing to remember when choosing a domain name is that your site should reflect what your company does and what it offers to your clients. Make sure that your name is short and easy to spell to have fewer problems in the future.
To find a domain name, you can use the internet and go to several domain name registrars. They can help you choose a name, and they can tell you where you can purchase it.
When you have decided how to select a domain name, you are now ready to purchase it. You can do this in several ways, but usually, it will involve going to one of the domain registrars and picking out a name for your site.
Once you have purchased your domain name, you will find that it is listed with many different domain name servers. These are the main servers that all websites are registered under. Therefore, when you register your domain name, you will determine which server your website will be on.
You also need to know how to select a domain name. You will need to choose the best words that will represent what you want your site to say. You want your site to be memorable and unique.
Once you have chosen your site’s best words, you will need to register the domain name. To do this, you need to go online, find the available names, and pay the registration fee. After you pay the fee, you will get a temporary certificate for your site that will allow you to use that name for a certain amount of time.
Once you have the domain name registered, you will have to use the site you purchased the name from and create the links for your site using the name you chose. Once you have everything set up, your site is live, and you will have your unique domain name.
Your domain name needs to perform one task appropriately, and that is it should be able to answer the below question:
“Is this site for me? And am I in the right place?”
That’s it. That’s the job that your domain name needs to answer.
The earlier you can help your visitors to find out why they have visited your site, the quicker you will :
- Drive more traffic
- Convert visitors into subscribers
- Receive more links
So how will you help them find an answer to the question: “Is this for me?” Clarity is the answer to this question. A domain name that is clear and precise is always successful.
So now let’s have a look at how you can select a perfect domain name:
- Try your best and stick with .com
- Keep your domain name short
- Make use of keywords in your domain name
- Try to avoid the use of Hyphens in the domain name
- Make it as unique as possible. Please don’t try to forge it
- Your Domain name should be easy to pronounce and spell.
As mentioned before, once you have your domain name selected, you need to buy that domain name quickly before it’s gone. Let’s have a quick look at how you can achieve this.
Domain registration is offered as a privilege by the majority of web hosting companies. With new hosting accounts, some of those businesses offer free domain registration.
If you’re starting a new website, then taking advantage of the deal and getting your domain name for free is a good idea.
When it comes to web hosting, Hostinger, GoDaddy, WPX Hosting, etc are good and the biggest brands. They’re an official hosting service suggested by “WordPress.”
It is necessary to keep in mind that for 1 year only, most hosts offer free domain registrations.
For the first year, many people take advantage of the free domain because you will have to pay for the domain name, regardless of getting it free of charge.
Step2: How to select a Hosting Service?
Learning how to select a web host for developers, authors, small business owners, and others is like looking for Mr. Right. It’s a familiar question: Which hosting provider should I trust with all my heart?
If done right, you can spend a lifetime of happiness with a trustworthy and high-performing host who is always available to answer your burning late-night questions by phone, chat, or email. However, rushing into a hosting relationship could lead to feeling stuck, misled, or extorted without doing your homework. Choosing the wrong host always ends with headaches and a mess, hanging on to all the files you used to share, and you are all alone again.
You need to make decisions and answer some of the questions before you select a hosting service. Let’s look at it in detail:
Decision1: What kind of hosting do you require?
You will have to choose what kind of server you want your website on, A shared server or a virtual private server (VPS)?
Here’s the difference between the two:
Shared hosting
Your site ‘lives’ with other websites on the same server in a shared hosting environment. Here, the server resources are shared by the websites residing on that server, such as RAM, disc space, CPU.
The most economical alternative is hosting your website on a shared server. If your website is just starting, it’s a perfect option because you don’t have many visitors. You don’t need a lot of disc space or bandwidth that is needed by high-traffic sites.
Linux hosting could be just what you need if you’re looking for extra protection. Linux hosting, as far as the operating system goes, is generally considered the safest alternative.
You should not opt for this form of hosting if your website gets a lot of traffic (or daily spikes thereof). Because the website is on a shared server, a significant amount of traffic can not be supported due to limited resources.
Virtual Private Server Hosting
Your website ‘lives in a virtual private hosting network on the same server as other websites but in an isolated environment. You receive dedicated computing power, RAM, and storage space that any websites cannot use on that server.
This hosting style costs more. But there is more control which means that you can process more user requests directly proportional to the website traffic. So if you have a well-established company and expect a lot of traffic, get VPS for your website hosting.
This hosting method is not recommended if your website is only an information site or will not receive many visitors. That’s because your money would go to waste if you get little traffic.
Bearing in mind these points, it’s up to you to pick what kind of hosting you need. You’ll probably do better with shared hosting if your website gets a couple of thousand visitors. Yet VPS hosting is the way to go if your website receives hundreds of thousands or millions of users.
Decision No. 2: Security with SSL or No Security?
For your website, of course, you need SSL protection.
Your website and customer details will be encrypted by the SSL certificate and ensure no outside hacker can steal them. Doing this is particularly useful if you are running a website that allows customers to enter confidential details, such as email, credit card numbers, and their home address.
Here’s what a certificate from SSL does:
- Encrypts any data that flows between visitors and your website. It implies that hackers can not see the information on your website.
- When they come to your website, it puts a green padlock on the visitors’ browsers. It tells them that your website is safe and enhances their trust that you’re a legitimate organization. Furthermore, instead of the standard ‘http:\\’, your domain name will start with ‘https:\\’.
- Google will rate you higher on its search engine if you add an SSL certificate to your site.
Decision No. 3: What Resources Do You Need?
When you get a hosting contract, the last thing you need to consider is how many resources you need.
It is a reasonably easy move that allows you to answer a few questions, such as:
- How many expert email addresses do you need to end up with @yourwebsitename.com? It depends on how many employees need this kind of technical email within your organization.
- How much space do you need on a disc? It relies on how many components of the media are on the website. The more photographs, videos, and files your website includes, the more storage space you use.
- How much bandwidth is needed? It relies on the traffic you are getting. You need to update your bandwidth if your website receives a lot of traffic or regularly crashes.
Once you answer these questions, selecting which hosting plan you need for your website will become simple for you.
Step3: Install WordPress in your Hosting Server
1. By using AutoInstaller
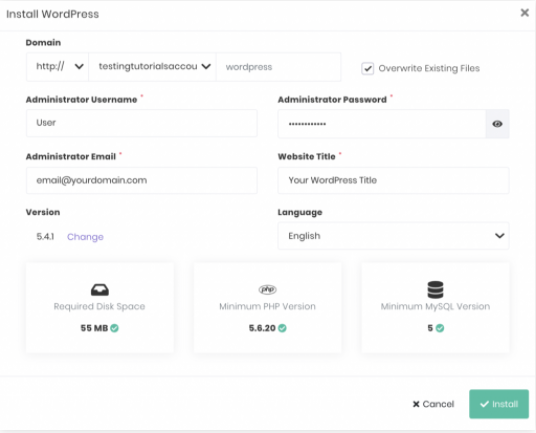
Once you have selected your hosting server, then you need to install WordPress on your server. Let’s take a look to install WordPress on your hosting server. I have selected Hostinger as an example.
- Login to your hPanel.
- Locate AutoInstaller under the Website Section.
- Click on the WordPress icon.
- Fill in the details and then click on Install.
2. To Install WordPress Manually:
Click on the following link to install WordPress manually. They have explained in detail how you can Install WordPress manually.
Step 4: Select a theme
There is no lack of WordPress themes out there. We get new free and paid WordPress themes with each passing day that cater to different websites. Blogs, magazines, portfolios, themes for videos, and much more! In short, there are plenty of WordPress themes, and the number is still increasing.
Now, the question arises: how can I pick a WordPress theme?
Are there any special considerations or conditions that you should keep in mind? Anything that you have to be mindful of?
How to select a WordPress Theme?
1. Know the requirements and budget.
Of course, this is the first issue. You should know your needs. Start by finding out the essence of the website you are constructing or operating. Is this a place for videos? Is it an easy blog? Will there be a lot of pictures?
Until finished, the type of WordPress theme that best fits your needs can be shortlisted. There are also questions related to architecture. For example, with a minimal WordPress theme, content-centric websites may be better off, whereas some sites need some animations and other tweaks related to appearance.
Besides, your budget is also important. You need to know whether you plan to spend money at all before you find out how to select a WordPress theme. You will find many people telling you all the free themes are terrible but don’t buy that advice. A good free theme complies with coding standards and is regularly updated, while premium-quality support does not support it.
2. Mind the quality and standards of the code
A poorly coded WordPress theme can have detrimental effects on the output of your website. It can slow things down, clog junk into your database, and even expose it to hackers. As such, select a theme that complies with the current coding norms and safer practices.
It’s more easily said than done, isn’t it? You might not be able to open every single file shipped in the theme package and proof-read the code.
Two shortcuts to this are open. Next, consider only those themes that come from reputed providers to be picked. Look for theme shops with a proven arsenal of luxury themes that have been around for a few years. Likewise, choose only those free themes that have had a couple of thousand downloads. You will stop garbage and bad code this way.
3. List the features you need
The list of features and functions that can or must be provided by a WordPress theme is a question that needs to be answered. Yes, your needs do depend on it. For example, you do not need the breaking news ticker on the homepage if you are not running a news site.
There are certain characteristics, however, which are always a must! Your WordPress theme, for instance, should surely be responsive and mobile-friendly. Your website will suffer if your theme fails to be sensitive.
How to add a theme to your WordPress
To add a theme to your WordPress, you need to head over to Appearance > Themes
You will find all the themes that are installed here. If you want to add a new theme, then click on Add New
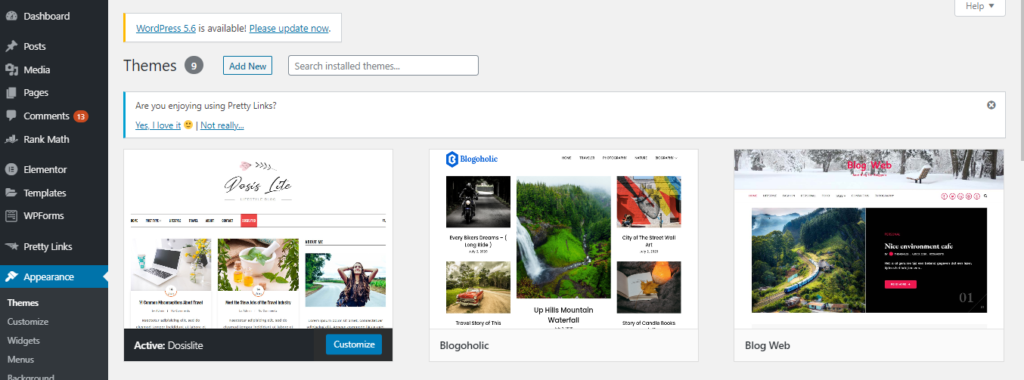
There are two ways by which you can add a new theme. You can either use the search field or upload a theme from your local hard drive.
1. Select and Install a theme from the official WordPress theme directory

If they are listed in the official theme directory, the best way to install themes on your WordPress site is to install them. Doing this enables you to search directly from your site’s admin page for the theme you need. Each theme in the official directory must have tags explaining its features, allowing you to easily search for the correct theme. If you are aware of the theme’s name, you can simply search for it.
Once you have searched for your theme, Your WordPress application will download and install the theme for you. Then click on Activate to activate the theme.
That’s it. You can go to the main page of your site and check the new look of it.
2. Upload a theme that you have already downloaded
If you have a theme that is not listed in the WordPress.org directory, upload it from Themes > Add New section in WordPress. To do this, click on Upload Theme at the top of the page.
Now, click on Choose file, select the archive of your theme from your local computer, and press Install Now.
WordPress will upload and extract the theme archive for you. Next, you need to press the Activate link under the message to enable your website’s theme.
That’s it. You can go to the main page of your site and check the new look of it.
Step 5: Add basic Plugins on WordPress
Now you have all the necessities set up to get started with WordPress. The next question that you would likely stumble upon would be How to install a WordPress plugin? There are so many plugins available that it will merely confuse you with which you need to get started.
Let’s look at which basic plugins you would need and how to set them up.
How to add Plugins?

Follow these steps to add a plugin to your WordPress.
- Go to Plugins in your WordPress dashboard.
- Click on the “Add New” button located at the top of the page.
- Search for the plugin through the search bar
- Once you have found your plugin install your plugin by clicking on “Install Now”
- Activate the plugin by clicking on “Activate Now”
4 Category of Plugins that are required on a WordPress site
1. Security Plugins
Although WordPress protection goes well beyond just plugins, they’re still a critical tool to keep your site tightly secured. However, it can be difficult to choose the right WordPress security plugins, particularly because there are so many to choose from.
Some of the security plugins for your WordPress site are All in One WP Security Plugin, Sucuri.
2. Backup and Restore plugins
Does the thought hold you up at night with the fear of losing your website? In a moment, all the time, effort, and money you’ve spent could be gone.
WordPress is an excellent product, but many things might go wrong. You could get hacked, your hosting company could go out of business, a bad plugin or theme could be added, the list is endless, and you could lose anything without a good backup. Hence it is recommended that you have a plugin that can backup and restore your site.
Some of the examples are: UpdraftPlus, backup buddy
3. Optimization Plugins
Due to the slow page load times, there is a high probability that you can lose traffic, subscribers, and even customers. Hence you need to have optimization plugins that will speed up your site.
Some of the best optimization plugins are WP Fastest Cache, WP Rocket.
4. SEO Plugins
Do you know who your competition is? There is an explanation of why they are your competitors: they are doing what you are doing.
And right now, they could even be doing it better. That doesn’t mean that you can’t win, but that means that you need all the support to get on top and stay on top!
Hence it is recommended to have an SEO plugin on your site to keep track of all the activities that will help you in your Search Engine Optimization.
Examples of SEO Plugins are Yoast SEO, All in one SEO pack, RankMath.
Basic Plugins to have in your WordPress site
Let’s take a look at the basic plugins that you need to have on your WordPress site.
1. WP Forms
Every website needs a contact form because it makes it easier for your visitors to touch with you. WPForms is the most user-friendly communication form plugin for WordPress.
This online drag & drop form builder makes it easy for you to create contact forms, email subscription forms, online order forms, payment forms, etc.
All common marketing and payment platforms are integrated with WPForms, so you can create powerful forms in less than 5 minutes.
2. RankMath
SEO allows you to get more visits to your website from search engines. Although WordPress is SEO-friendly out of the box, there is so much more you can do to use SEO best practices to increase your website traffic.
One of the most well-known WordPress plugins of all time is RankMath. RankMath provides the most comprehensive solution of all the WordPress SEO plugins, with all the functionality and resources you need to boost your on-page SEO.
It enables you to add meta tags, build sitemaps, link your website to the Google Search Console, configure it for social media, and more.
3. UpdraftPlus
Every day, so many websites get hacked. Also, due to simple mistakes, there are chances that parts of your WordPress website might often stop running.
For example, if most people on their websites use 10 or fewer plugins, and half of those receive monthly updates, it is obvious that the possibility of compatibility errors is common. If you are experiencing a compatibility issue or just want to migrate your site, a single recent backup will save you many headaches.
There are many online WordPress backup plugins, but few of them are as effective and easier to use as UpdraftPlus. It helps you to restore your website to the previous stage in a hassle-free way.
4. Elementor
Elementor is one of the coolest additions to the must-have WordPress plugin list. With over 5,000,000 active installs it offers you the chance to craft original designs that are somewhat independent of your current theme for your pages.
It implies that to add all those cool effects like background overlays, hovers effects, animations, and more, you don’t have to be a web development fan. It can all be done with a simple drag-and-drop.
For those who want to build a lovely landing page for their company, Elementor is useful. Also, for those who do not have deep pockets to hire a developer, Elementor is the best choice.
5. PrettyLinks
Pretty Links Pro is one of the best plugins for WordPress for link management. It enables you to easily manage affiliate links while making it easy to quickly share your affiliate links.
It is the perfect tool for WordPress affiliate marketers, podcasters, company owners, and others who want to create short URLs easily.
6. MonsterInsights
MonsterInsights allows you to connect your website to Google Analytics “properly,” so you can see exactly how your website is found and used by individuals.
The best part is that, inside your WordPress dashboard, it shows you all the important stats that matter.
To increase your traffic, subscribers, and revenue, you can then use MonsterInsights and optimize your website accordingly.
7. OptinMonster
OptinMonster is the market’s most popular software for conversion rate optimization. It allows you to convert abandoned website visitors into customers and email subscribers.
This plugin and application for WordPress help you quickly get more email subscribers.
OptinMonster comes with pre-made high-converting opt-in forms that you can use their drag & drop builder to customize easily. Their powerful display targeting features allow you to personalize each user’s campaigns so that at the right time, you can show the right message.
For bloggers, company websites, and eCommerce websites, it’s a great solution. Essentially, if you want to make more money from the traffic on your website, then you need OptinMonster.
It helps you retrieve abandoned cart sales, convert visitors to the website, and expand your email list. To see how much success other organizations are having by using OptinMonster, read these case studies.
Step 6: Create your first blog
Now that you have built your website, you have an incredible email newsletter, and you have set up your social media accounts, all of which have helped develop a great relationship with your clients. But you want to take your relationship-building abilities to the next level, even with those choices already in place.
Great news? With the help of a blog, you can do it. So let’s see how you can create a blog and add it to your site.
Step 1: How to add a blog to your WordPress website?
These are easy-peasy steps, and let’s look at them in detail.
- Add a new page in WordPress.
- Name the page.
- Publish the page.
- Navigate to the Settings section.
- Designate a Posts page.
- Determine the number of posts you want.
- Write and publish your first post.
1. Add a new page in WordPress

Sign in to your dashboard with WordPress, and then click Pages > Add New. This process is fairly self-explanatory. If you already have an existing business website and you want to add a blog, you will need a page for your blog to live. You don’t want it creeping on other pertinent page information.
2. Name the page
You then need to give a name to your page so that it can be easily identified.
3. Publish the page
To make your page go live, you need to publish the page.
4. Navigate to the Settings Section

When you’re in your Dashboard, you’ll see a column along the left with all the different things you can do in WordPress. Go to Settings > Reading as shown above.
5. Designate a Posts Page
You need to click on a static page and then select Blog under the drop-down menu. It will help you to know where your blog appears. Make sure to select “Blog” under the drop-down menu for “Posts page” and not “Frontpage”.
6. Determine the number of posts
It completely depends on you as to how many posts you want to get appeared on your blog. It can be 5 or 10.
7. Write and Publish your Post
Now you are ready with your blog! You simply need to write your content and be consistent with your posts.
Step 2: Add a Contact Form
You would want to add a contact form to your website so that your customers can easily contact and approach you for your products and services. By default, a built-in contact form does not come with WordPress, but there is a simple way to add contact forms to your web. Let’s have a close look at how you can add a contact form on your WordPress website.
1. Choose the best plugin for the contact form
Choosing a WordPress contact form plugin is the first thing you need to do.
While you can choose from many free and paid WordPress contact form plugins, WPForms are one of the best available.
The three reasons why WPForms are to be the strongest are below:
- It is the plugin for the most beginner-friendly contact form available. To conveniently create a contact form with just a few clicks, you can use the drag & drop builder.
- WPForms Lite is 100 percent free, and you can use it (over 3 million sites use it) to create a quick contact form.
- Then you can upgrade to WPForms Pro when you are ready for more powerful features.
Let’s go ahead and install it on your site now that you have agreed on the contact form plugin.
2. Install a Contact form Plugin
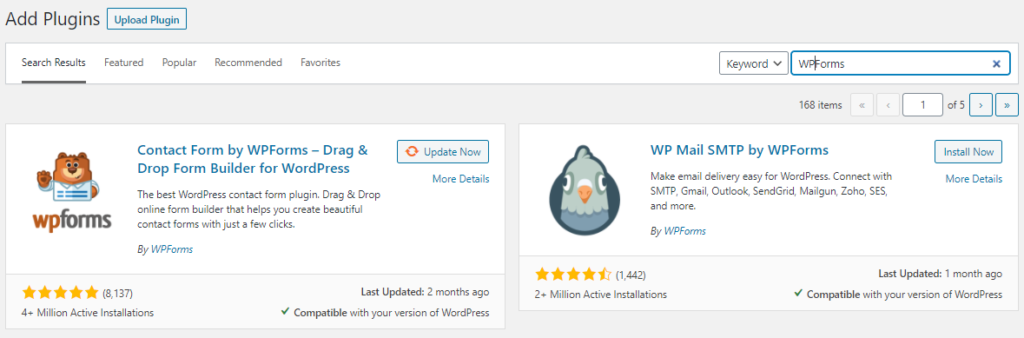
I have explained this with the help of WPForms because it is free and easy to use.
To install the plugin, go to Plugins > AddNew.
In the search field, type WPForms and then click on the Install Now button.
Once the plugin is installed, then you need to Activate the plugin.
3. Create a contact form in WordPress

Now that you have WPForms activated, you are ready to create a WordPress contact form.
Click on the WPForms menu on your WordPress dashboard, and then go to Add New.
It will open up the drag and drop type builder for WPForms. Start by giving your contact form a name, then select a template for your contact form.
WP Forms Lite only comes with pre-built templates like Blank, Basic Contact Form, and so on. To build just about any sort of contact form you want, you can use these.
4. Configure the notifications and confirmation of the form
Now that you have built your WordPress form, the form notification and form confirmation must be properly configured.
Form confirmation is what visitors to your website see after sending the form. It could be a message to thank you, or you can redirect them to a special page.
Notification of the form is the email you get after someone on your WordPress site submits the contact form. By going to the Settings tab within the WPForms form creator, you can customize drop-down both of those.
Usually, the confirmation of the form is left as the default Thank You message. However, if you like, you can change it to redirect it to a specific tab.
When you go to the notification settings, all the fields will be auto-filled dynamically.
5. Add WordPress contact form in your WordPress

Now that you have finished configuring your contact form for WordPress, it’s time to add it to the website.
The first thing you need to do is create a new WordPress page or update an existing page where you want the contact form to be added.
We’re going to use the WPForms block to add a form to a page. To check for WPForm, simply click on the Add New Block button and then click to add it to your page.
WPForm block will now appear in the content area of your page. You need to click on the drop-down menu to select the form you created earlier.WPForms will load your contact form preview inside the editor. You can now save or publish your page and visit the site to see it in action.
Congratulations! Your contact form is ready to be filled by your customers.
Step 3: Add Google Analytics to your blog
Google Analytics is a free framework for online monitoring that can give you accurate insights into your website’s users. You will learn more about who they are, how they act, and the steps they take to transform and become a client.
It’s quick to get set up on the website. What’s more, you can integrate Google Analytics with your website dashboard if you have a Build Account to get insights at a glance whenever you work on your website.
Here’s how you can begin:
1. Create a Google account, or you can use an existing one
If you have already set up an existing Google or Gmail account, you do not need to build a new one, so you can skip to the next step. Follow the directions below if you do not have a Google or Gmail account.
Click on the following link to create a Google account.
Fill in the form with all the details, and then click “Next Step.”
Google will then ask you if you would like to build a Google+ profile that is public. That is optional, and if you don’t want to, you don’t have to set it up. “If you would like to, click” Create your profile “or click” No.
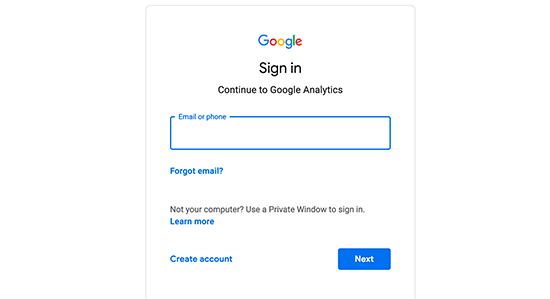
2. Using a new Google Account to set up your Google Analytics
We will move on to setting up Google Analytics now that you have a Google account built. First, go to this website address when you are already logged in to your account: http://www.google.com/analytics/.
In the top right corner, click on ‘Sign in to Google Analytics’.
Select “Website” to track your website details.
Fill out all the details on this page.
- Account Name
- Website Name
- Website URL
- Industry Category
- Reporting Time Zone
Finally, click on the blue “Get Tracking ID” button at the bottom.
A Google Analytics Terms of Service Agreement will appear, and you will need to accept this agreement before you can proceed further.
Once done, a unique tracking code will be presented to you that you need to apply to your website.
3. Install the tracking code
You would need to install the tracking code on every page of your website for Google Analytics to report back on several website metrics. Therefore, you need to make it appear on all your website code pages to install the code.
You can contact the web design company that runs your website if you have no experience adding code to your website.
Copy and paste the tracking code to either your website’s header or footer file.
If you add the tracking code to the header file, make sure it contains the code before the < /head > tag closes. If you add a tracking code to the footer file, make sure it contains the code before the < /html > tag closes.
4. Make sure that the tracking code is on all the pages
To see if the Google Analytics monitoring code remains on all sites, you can use a useful tool called GA Checker to search the entire website (up to 10,000 pages). All you need to do is enter your website’s name and then click on the “Check Your Site” button. You will see a tick mark next to Google Analytics on all pages if you have successfully activated the tracking code.
5. Learn how to use Google Analytics
It’s going to take 24 hours for Google to start gathering data from your website now that you’ve activated the tracking code for all the pages on your website. So please keep in mind that one day Google Analytics will still be behind you, and you will not be able to access present-day results.
Step4: How to boost the SEO of your WordPress Blog
Let’s look at some of the steps as to how you can boost the SEO of your WordPress blog:
1. Install a WordPress SEO Plugin
You need to install a WordPress SEO plugin that can help you to optimize your site. Some of the WordPress SEO plugins are Yoast SEO, All in One SEO, RankMath.
2. Set the domain
If you select your favorite domain as https://domain.com or https://www.domain.com will not affect your SEO, but on just one of these, you need to make sure that your website is available, as Google considers these to be separate URLs.
You need to make sure that you have an SSL certificate and run your website using HTTPS. Talk to your hosting company or developer if you have not got a certificate enabled.
3. Check your site’s visibility settings
WordPress allows you the right to ‘discourage your website from indexing; by search engines, which simply means that it won’t rank. Developers widely use it to avoid being indexed because pages and content are not complete while a site is in progress.
4. SEO Permalinks
WordPress uses URLs like this by default: https://domain.com/? To p=123. These URLs do not search engine-friendly, and from the URL alone, there is simply no way to even start describing what the website is about.
You can choose a custom URL structure can be chosen from Settings > Permalinks
5. Verify your site on Google Search Console and submit your sitemap
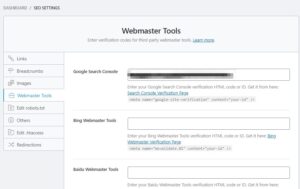
You need to verify your website on Google Search Console. Follow the verification steps and choose the ‘HTML tag’ method. From there, jump over to the SEO plugin: SEO > General > Webmaster Tools.
Then you need to enter the contents of the HTML tag into the ‘Google verification code’ box. Once you have verified your site, you need to submit your sitemap.
Goto “Sitemaps” tab and submit your sitemap’s location (sitemap.xml)
6. Use Internal Links
You need to make use of internal linking to establish relevance between the various pages on your website. The process is quite simple. You just need to highlight the text you want to link and then click on the ‘link’ button. Then you need to paste the URL that you want to link.
7. Add Alt Text to images
You need to add alt text to images simply because the search engine does not understand the images. Go to the ‘Image Settings’ section in the images and add your alt text. Give a proper description of the image.
8. Install a Cache Plugin to improve the speed of the site
It is recommended that you install a cache plugin to improve the speed of the site. Some of the best cache plugins are W3 Total Cache, W3 Super Cache.
Step 5: How to bring traffic to your blog
The frustration of attracting readership has been endured by every business owner who has ever hosted a blog. While we would all like it if readers all came to us magically, the truth is, creating an audience takes some effort.
It’s easy to get discouraged and just give up on blogging. Still, once you experience the advantages, you will realize that by attracting traffic to your site, creating a social media following, and making an impression on prospects and customers alike, your blog can have a huge impact on your company.
These are some of the strategies that will help you bring much-needed traffic to your blog.
1. Write More
Studies suggest that the more often you post your blog, the more traffic it receives. Google gives blogs with new content a higher priority, so update your blog at least twice a week if you want to get more noticed from the search engines.
2. Promote on Social Media
Share each new blog post on social media such as Twitter, LinkedIn, Facebook, Google+, and Pinterest. Social networking sites can become some of your top traffic sources if you spend time building your networks and sharing great content.
3. Write Good Titles
The titles are almost more important than the material itself for your blog posts. That’s because titles assist potential readers in determining whether to press and read more. Your readership is going to improve as you write good appealing titles.
4. Include Photos
Studies have shown that images improve readership in blog posts. A photo not only makes the post more visually appealing, but you can also include keywords on the photo in the Alt Image tag, improving your site’s search engine optimization (SEO). Remember that since you risk breaching copyright laws, you should not just pull any picture from Google. You can make use of stock images from sites like Pexels and Pixabay.
5. Integrate Keywords
With regards to SEO, keywords are the heart of SEO. One of the best ways to create more website traffic is to ensure a keyword strategy for every page on your site. So, pick one main phrase for each blog post you write that you hope readers can use to find that post. Include it in the post title, the headline on the blog, at least twice in the page’s content, in the featured image, and part of the link to the page.
6. Integrate Links
Have a link to that company’s website when you reference another company’s product or service in a blog post. Google wants to see outbound links on your blog. Plus, when you have the tools to make it easier for them to find the stuff they’re searching for, readers appreciate it.
7. Write Guest Posts
Locate other blogs that meet your target audience and offer guest blog posts to contribute. If the website has a wide audience, you can guarantee the readers would want to connect with more of your material in exchange.
8. Cross-Promote to your Mailing List
Share the first paragraph from your recent blog posts instead of writing all the new material for your electronic newsletter and provide a link to continue reading on the web. Not everyone takes the time to read your blog, which will help get your subscribers engaged in your blog.
Step 6: How to Monetize your Blog
It can seem like one of the most frustrating activities when you start with your blog. How can anyone find the time or the means to consider not only the art of blogging itself but also that of moving large volumes of traffic with too much data to absorb and tactics to digest?
We all know that any altruistic endeavor isn’t blogging. People deserve to have their words seen and shared. In their respective industry or niche, they want to gain the masses’ respect and raise their authority. However, it’s not quite that easy. It’s not only hard to push traffic to a blog, but it is also difficult to monetize the traffic you get.
Let’s have a look at how you can monetize your blog:
1. Affiliate Marketing
Leveraging affiliate marketing is one of the most common strategies for monetizing a site. When you’re just starting, and you don’t have your goods or services to market, this is extremely useful. All you have to do is build content that will finally be in line with whatever affiliate deals you plan to push out.
For instance, if you run a fitness blog, you can easily sell wellness, weight loss, or bodybuilding supplements to affiliates. Since the content is already attracting people interested in health, it allows you to build a near-automated stream of passive income by selling these types of items.
2. Advertisement
Although most people may assume that adding some pay-per-click (PPC) ads would be a fantastic way to make loads of money on their blogs, unless you have huge amounts of traffic, the revenue would be marginal at best, as in 15,000+ visitors per day or more.
However, by using display advertising instead of PPC ads, you could easily discuss terms directly with advertisers. You can generally negotiate an amount that will be much more favorable than revenue from regular PPC advertising, as long as the ads are within your particular niche or industry.
3. Email Marketing
One of your blog’s most effective ways to make money is directly through email marketing. But you need to build your list to be efficient. Use one of the most popular email marketing platforms such as ConvertKit, Aweber, or InfusionSoft to implement the systems needed to start marketing via email, whether you promote blog updates or build a lead magnet. You should expect to generate roughly 1 per month per subscriber.
4. Sell eBooks
Ebooks provide a reasonably fast way for your blog to make money. Create an ebook that is consistent with your blog’s content. Non-fiction ebooks are relatively easy to make, and the ebook will likely generate a healthy profit if you are teaching a skill that many people struggle with.
5. Sell Courses
Another way you can benefit from blogging is to offer digital online courses. Develop intuitive and helpful courses that add a huge amount of value. Another great avenue for passive income by putting your heart and your soul into these courses.
Frequently Asked Questions about Blogs
1. I am not getting much traffic. What should I do?
To attract visitors to come and view your material, you must do the job actively. They will not find you all by themselves. There’s something you can’t just publish and expect people to start coming in. You have to get out there, meet people who are interested in what you do, and show them enough value to get them to stay at your home online.
In the early days of your blog, try to spend most of your time going to the various places where people in your audience hang out and work to attract them to come to you.
2. How do I come up with various content ideas?
To build your blog’s archives and to attract an audience, you need new material. As a writer, producing and posting new posts is one of your primary tasks and something you should prioritize.
Having ideas is all about the opportunity to put yourself in your audience’s shoes. What’s there on their minds? What questions do they ask? What are they having difficulties with? Then, begin to think and get creative.
3. How do I get Followers and Page Likes?
In your social media presence, you need to ask yourself what importance you have and what should be the primary reason for others to follow you and notice you. You just can’t wait for people to find you first if you have that figured out. You’ve got to go for them on your own.
Check the various platforms and follow them first for individuals speaking about your subject. Enter the debate and explain to them why you’re worth listening to.
4. I do not have any specific niche? How do I get started?
You need to dig deeper and find what makes you different and special. What are you spending many of your hours on? What is it in your spare time that you enjoy doing?
What is it in which you know a lot? There is still something you have that can be of use to other people. Be it informative, educational, and/or entertaining.
5. There are so many blogs already out there? How can I make my blog stand out?
You are special. You are distinct from all the others. You must bring more of yourself into your content and, in general, your blogging presence. The more exclusive your blog would be by bringing more of yourself into the open. There isn’t much to be scared of. Only get out there for yourself and enjoy the process.
6. How many words should my article have?
There are no definite guidelines on how many words your blog posts should have.
With 100 words, there are successful posts, and with 10,000 words, there are successful posts. It all depends on your situation, your style, the subject that you cover, the multimedia formats that you use, and more. The best practice is to have at least 1500 words in an article.
7. How many times should I post in a week?
There’s no right or wrong answer to this. There are many blogs with a variety of posting frequencies. Some posts are rare but long. But yes, consistency is the key to success. So try to post consistently.
8. I don’t know anything about web design – how do I get a nice-looking blog?
You’re fortunate because you don’t need design expertise to have a nice blog using WordPress resources. WordPress comes ready for you to use, with thousands of different design templates.
To find the one you want and the one that suits what you are trying to do, simply evaluate and check the various choices. Setting up a new template is one click, so you don’t need much expertise or time to adjust your site’s look.
9. My blog is slow to load. How to speed it up?
You need to load your blog quickly as people are very impatient. They obviously won’t wait for your site to load for 10 seconds (or even much less time). The back button is a friend of theirs, and that is your enemy.
Maintain your blog to a minimum. Maintain just the most significant features. Delete everything that isn’t important. Have you got a big sidebar that nobody is looking at? Get rid of them. Have you posted really big images? Optimize them.
10. I cannot find my blog? How do I get in search results?
One of the significant aspects of attracting visitors to your site is getting your blog indexed by Google and other search engines.
Google can be an excellent source of organic blog traffic. It would also be a perfect first step to get into Google searches by just starting to publish daily content and having a presence on Twitter, Facebook, and other social media.